Saturday, August 22, 2009

Playful Pacific Patio

A little background. It all started when my neighbor moved out and gave us this...... a mini trampoline.
Now, we live in a tiny space....where on earth was I going to put this thing? I surely wasn't going to deprive my girls of the oodles of fun they could have on such a contraption. So, I took a look at my over grown, waste of space garden area and thought "what can I do to make this more kid friendly?"
Here is my only pic of the garden before. Bonus you get to see my smilin' girlie.

So, I ripped everything out while seriously underestimating the root system of the fern, then headed to Home Depot.

I knew I wanted to put in a sand box of some kind so I walked around Home Depot to find some inspiration for a divider. Hmm, these tree rings will do. I spray painted them to fit the ocean theme I was going for, then placed them in a wavy fashion across the dirt. (FYI, I used broken pieces at the ends that they gave me for free).

I dug down about 3 inches then laid trash bags on the dirt. Before laying the trash bags, I cut holes in them for drainage. I taped the trash bags together then poured bags of sand (also found at Home Depot) in to fill the space.


Next, I laid about 2 rolls of sod (only $4 a roll) on the other side of the divider to soften the area and secure the dividers. Then I created a little raised flower garden in the corner.

To add a tad more fun, I found this piece of potential tossed out by my recycling bins. How could someone get rid of such a treasure?

I sanded and spray painted with a wave stencil.

Glued a metal welcome sign to the table that I taped off and painted 9 squares on.

Then glued magnets to some wooden cuties to create a magnetic tic-tac-toe board.


My next project, the interpretive, magnetic story board. I used more of those metal welcome signs from the dollar store and mod podged sea landscapes on them. I simply tore paper into desired shapes and glued them on.

Then, I had this cute outdoor place mat and sewed the sides up to make a pocket for holding all of the magnets for the story board (Excuse my beautiful toes:) I was just trying to add to the downward perspective).

I just used the glue gun to stick magnets on these wooden cuties and wah-lah...an interpretive magnetic story board. (Also works as patio art).

Last but not least,
I had to save SOME space for me.

I took baby food jars, spray painted the lids, punched a hole through them and threaded ribbon through the hole. Then I secured it with multiple knots, nailed it to the fence and attached the jars to the lids.


Now some of our tiny seashore treasures have a special place protected from the elements. (I found the sea glass on clearance at Michael's Craft and just thought it was pretty).

Before hanging the baby food jars, I dipped the end's of the ribbon that the nail's were going through into clear nail polish. This allowed a more secure fastening and the ribbon will be less likely to fray at the end.

That completes my Playful Pacific Patio makeover. We have already done picnic's and play date's galore out there. I can't believe I didn't think of this sooner. Both my children and I are MUCH happier now that they have an outdoor space to play in while we are home.

We are linking this post to Kimbas DIY party, check it out for some inspiration!


Wednesday, August 19, 2009

Is It Fall Yet?

I am linking this post to one of my favorite blogs~ Southern Hospitality~ for Rhodas weekly Thrifty Treasures Party!

We, The Enchantresses, LOVE decorating for the fall!!!! Last year I (Enchantress #2) scored big time at Hobby Lobby and got all of these pretties for 90% off!!! Click on the picture to see the awesomeness close up!:) I am counting down the days until I can spread this goodness through my house! Hubby on the other hand says if I EVER buy another pumpkin, he will have to send me to pumpkins anonymous!:) You can never have to many pumpkins right? So, when do all of you start decorating for fall?
Go on over to SouthernHospitality to see some more thrify finds!

Tuesday, August 11, 2009

Blog Make Over

You may have noticed that our little blog has had an extreme makeover! We, the Enchantresses 3 have limited computer skills, and have wanted to change it up for some time, but didn't know how!
One of the reasons we love blogging is for the way it connects us to other amazingly, talented, women, who share our interests and in turn we can be inspired by each others different talents and ideas!

I have been a reader of the adorable blog LittleLovables
for quite some time, and could spend forever reading through old posts! I just know if I were to meet Lisa in person we would be the best of friends! She has such amazing style!

Well, Lisa offered to make us a new blog banner out of the kindness of her heart. Seriously who does that for someone they have never met?

If you have never visited LittleLovables you must! I seriously do not know where she finds the time, but she has the most amazing ETSY shop called JeweledAmbrosia where she makes and sells the most amazing vintage inspired jewelery!!!

My heart skipped a beat as I was looking through her shop! I wish I owned every single piece!


Just amazingly beautiful! Swoon!!!

And you know how I love me some animal print! LOOOOOOVE this!

Isn't Lisa just darling!!! She also sells vintage clothing in her shop

Oh my!!!! Look what she did to make over her lamp shade...........squeal!

I wish that she and I could go shopping together! Here are a few pictures of one of her recent shopping trips. Wouldn't you just die for that blue dress?!

Seriously, I am so thankful for the sweet friendships I have made through blogging! You MUST go on over and visit Lisa at LittleLovables ! You will be so glad you did!
Thank you so much Lisa for making our blog KICK AWESOME!


Wednesday, August 5, 2009

Shabby Chicalicious Baby Shower Part II

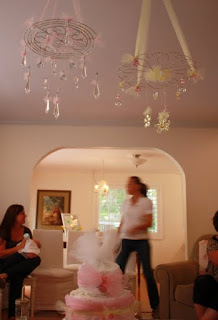
Our next project included the metal chargers, fishing line, bling, and tulle. We created our own simplified chandeliers. Here is Enchantress #3 froofing the tulle. I love that stuff!
We hung two of them at the center of the main room.
They hovered over Sarah's signature diaper cake.
Command hooks work great to temporarily hang decorations!
After making these I totally want to redecorate my girls' room centered around them!
These homemade chandeliers can be made with any type of frame you desire and you can hang anything you want from it. Sarah, being the genius she is, suggested they would also make gorgeous baby mobiles to hang above a crib! How cute would that be?

Next I had to show you a.) how Sarah uses scrap paper to hide water bottle labels, and b.) these ADORABLE lids she found for regular ol' mason jars to make for some fun sippin'!

These oh-so-cute daisy lids can be found here.
We can't forget the cakes. Another friend Stephanie made these and they were not only beautiful but delicious!


Then...Sarah was inspired by this site ,(which also has a great tutorial) so we searched out our houses as well as antique and goodwill stores to find cute handkerchiefs. We simply used rubber bands and ribbon to hold them on both small and large mason jars.


We added hanging wire and flora. These were so simple and really added that shabby feel to go with all of our bling.


Last but certainly not least...the candy buffet!
I had way too much fun collecting pink and yellow candy for the past 2 months.

A candy buffet not only makes your colors pop, but provides a chicalicious take home favor that the guests can enjoy helping themselves too.


Thus ends the Shabby Chicalicious baby shower. Hope you have been inspired!

We are linking up with our friend Kimba for her weekly DIY party.